Operation guide: Londinium Outskirts
| Operation | Contracts | Guide |
| #10 (Ashring) | Permanent Site |
|---|---|
| #11 (Fake Waves) | Rotating Site (Day 7 and 12) |
| #12 (Base Point) | Rotating Site (Day 6 and 10) |
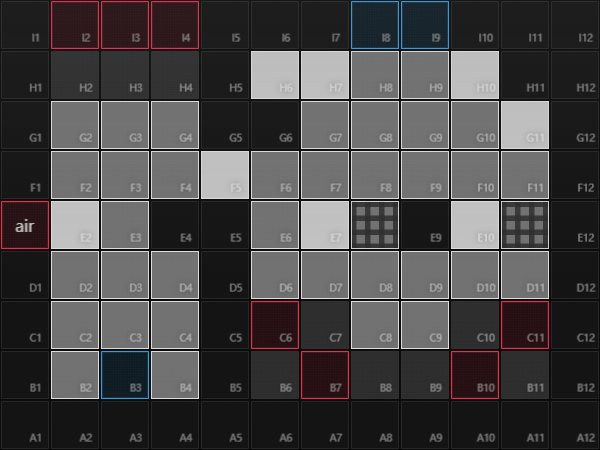
Having a wide open area, Londinium Outskirts takes the escalating challenge of Contingency Contract's seasons to a whole new level where this time we are not only contending with the enemies, but also the Londinium Secondary Defense Artillery, a literal artillery which will fire at the friendly unit with the highest block count whenever it is charged up, dealing a grand 3000 Pure damage over a large radius, and not even invisibility/camouflage could save anyone from it! The saving grace is that the Artillery damages both friendly and enemy units, so it can be exploited to thin out the enemy ranks especially with the Environment: Loaded Shell Contract which increases the Artillery's damage to 4000 (though this also means that the player will have to be more careful to ensure that their Operators can withstand the blast) and if the Objective: Well-Equipped Contracts which increases the enemies' DEF and RES are taken. In addition, while the Artillery is capable of harming invisible/camouflaged units, it cannot target them; there are two Exhaust Grilles on E8 and E11 which can be used to keep the Artillery from getting their sights on important melee Operators.
Speaking about the enemies, this time we are facing the Military Commission of Kazdel's Heirbearer Sarkaz army from Episode 10, and be on the look out for Reborn Creations: Gifts and Touches of the Sanguinarch, that spawns from the Heirbearers upon their defeat, only takes a mere 10% Physical and Arts damage, and increases the block count of friendly units blocking them by 1 each, up to 6 (while still counted when blocked themselves), making the blocker more likely to be targeted by the Artillery. The Creations can be easily taken out by the Artillery though, but the Objective: Born Anew Contracts will buff the Creations' HP and ATK, allowing the Gifts to withstand the Artillery blast without Environment: Loaded Shell (albeit in a near-death state) and hit even harder, and the Environment: City Watch Contracts cause additional Gifts to enter the battlefield!
- Manfred: Living up to his reputation as a capable Kazdelian Sarkaz general, Manfred uses a Teekazwurtzen drone whose attacks deals Arts damage in range and charges up the Artillery, only using his sword in the second phase at which the Teekazwurtzen also provides supporting fire and charges the Artillery even faster including in the transition at which the Teekazwurtzen attacks random friendlies across the map, and having Focus which increases his ASPD in every successive attacks as well as Military Training which gives him a significant Physical and Arts dodge that can be nullified for a while by having him take an Artillery blast to the face which also momentarily Stuns him, making him a tough foe to deal with. While having lower HP, ATK, and RES than in Episode 10, his namesake Contracts will buff Manfred to menacing levels and complicating the efforts to dispatch him, most notably as both buffs his HP and ATK, and shortens the Military Training reactivation time:
- The Teekaz Reborn Contracts also extends Manfred's attack range, allows the Teekazwurtzen to hit two targets simultaneously (or attacks twice if only one target is in range) on his second phase, and makes him immune to Stun including by the Artillery, allowing him to continue unleashing hell even after being blasted by the Artillery from greater distances.
- The Death Trap Contracts also buffs Manfred's RES, makes him spawn earlier than usual, and gives Reborn Creations and Sarkaz Heirbearers an aura that periodically deals Arts damage to nearby friendly units while he is present (like that in H10-3), allowing the Heirbearer army to whittle down the defensive line as Manfred rains down fire upon friendlies.
- Sarkaz Heirbearer Hatedrinkers: These strong Kazdelian Sarkaz warriors are fueled by the malice of their fallen brethren, buffing their already high ATK for every Reborn Creation present, which allows them to deal severe damage, if not knocking out, friendlies with each strike if the map is filled with Reborn Creations, in addition to turning into a Gift of the Sanguinarch upon defeat! The Objective: Manfred's Elites Contracts buffs Hatedrinkers' HP and RES, and makes them invisible, making it more difficult to stop them before they get too close for comfort, and the Environment: City Watch Contracts cause an additional Hatedrinker to show up at Level 2.
- Sarkaz Heirbearer Artificers: These Kazdelian Sarkaz engineers can charge up the Artillery (but they will only do so once) which can be interrupted by disabling or defeating them at which the Artillery loses some of its charge, and turning into a Touch of the Sanguinarch upon defeat. The Objective: Manfred's Elites Contracts buffs Artificers' HP and RES, and makes them invisible, allowing them to safely charge up the Artillery if the player lacks detection, and the Environment: City Watch Contracts cause more Artificers to join the fray.
- Sarkaz Casters: These mercenary Sarkaz casters boast good stats to boot and can leash the first friendly unit within range to disable them for a good amount of time and dealing Arts damage over time, but can be easily handled by deploying a weak unit, preferably Executor Specialists, close by to make them waste the leash ability.
- Sarkaz Requisitioned Engineering Drones: These "blessed" drones are invisible and charges up the Artillery in each attack, but loses HP over time. Nevertheless, Engineering Drones shouldn't be left alone as they can easily slip towards the Protection Objectives if not taken out (or at least, weakened) in time and speeding up the Artillery's salvo.
General strategies
- Mudrock's Ward of the Fertile Soil completely protects her from the Londinium Secondary Defense Artillery, and Crag Splitter allows her to easily deal with swarms of enemies without little trouble from Reborn Creations. As a matter of fact, the Creations' block increase works in Mudrock's favor because the more enemies she blocks, the faster Crag Splitter charges up, resulting in a near-constant uptime. All of these allows her to easily take care from the left side of the map when deployed, even at high Risk with almost no support. However, make sure that Mudrock does not take too many Artillery shots as she won't have access to her Ward as often and it would be more advisable to direct the Artillery to the right side of the map anyway to deal with the enemies.
- Mudrock can be replaced by a high-HP Centurion Guard (especially Specter due to her Bone Fracture, but Gavial the Invincible can work) or Mountain with Sweeping Stance supported by a Medic.
- Manfred's biggest annoyance is his Military Training, so unless if one is aiming for Risk 19+, don't bother picking the Manfred Contracts. The best way to deal with Manfred are Pure damage sources including:
- Kal'tsit with Mon3tr and Command - Meltdown, though this requires micromanagement. It is worth noting that if Kal'tsit is in at least Elite 2 Level 1, Mon3tr will be able to survive an Artillery blast at full HP even with the Loaded Shell Contract.
- Nearl the Radiant Knight with Blazing Sun's Obeisance and preferably the DRE-X Operator Module. The Blazing Sun spawned by Blazing Sun's Obeisance also helps her dealing with the Reborn Creations.
- If possible, one may direct the Londinium Secondary Defense Artillery to Manfred himself, and use Operators with high HP and/or DEF and RES with support of at least two Medics to stall him and let the Artillery wear him down.
- Remember that Manfred is vulnerable to Stun (unless with the Teekaz Reborn Contracts), Freeze, and Levitate, hence it is recommended to use these to disable his Focus; do note that the effects' duration must be at least 6 seconds for this to work!
- If Manfred is killed before the Sarkaz Caster at the left side of the map appears, then the second wave consisting of two Gift of the Sanguinarch will not be triggered. In this case, the second wave will instead be triggered when all enemies at the left side (including the Sarkaz Requisitioned Engineering Drone) are dead.
- If any of the Touch of the Sanguinarch are spawned from either of the Gift of the Sanguinarch or the Sarkaz Heirbearer Artificer before the aforementioned Sarkaz Caster dies, then the trigger for the second wave is the last of the Touches killed, unless there are still live enemies on the left side, in which case the second wave spawns when all of those and the Touches spawned from the Gifts and the Heirbearers are dead.