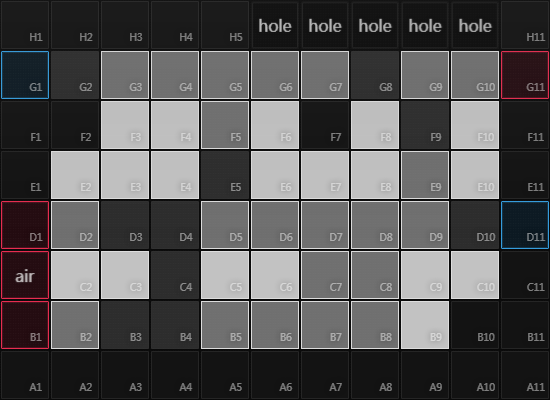
Operation guide: Chernobog (Annihilation)
| Operation | Guide |

The first of the Annihilation operations and one of the three Permanent Missions after the Annihilation Rotation System is introduced, Chernobog (not to be confused with the nomadic city) is the easiest and serves as an introduction to Annihilation operations.
Strategy
- Squad composition
- 1 Splash Caster
- 2 Defenders
- 1 Guard
- 2 Medical Medics
- 2 Marksman Snipers and 1 Artilleryman Sniper
- 1 Pusher Specialist
- 1 Charger and Pioneer Vanguard
This strategy is used by the youtuber Just3c[1] with permission from him to use his guide here.
For this strategy, all Operators must be in at least Elite 1 Level 1. The Pusher Specialist does not need to be leveled, but does need a skill level of minimum 4 with the first skill equipped. The higher the levels of the Defenders/Medics, the easier this will be. One of the Snipers must have more than 900 HP.
Step 1
- Deploy the Pioneer Vanguard on D9 facing left.
- Deploy the Charger Vanguard on D7 facing left.
- Deploy the Splash Caster on E8 facing down.
The Charger Vanguard will generate lots of DP from the horde of enemies coming, while the Pioneer Vanguard charges their skill and the Splash Caster helps for crowd-control. It is important that the Splash Caster is kept out of range of the Charger Vanguard's "kill zone" or else it will steal kills from the Charger Vanguard which will not generate DP.
Step 2
- Deploy the Sniper with the least HP on C9 facing left.
- Deploy the first Medical Medic on B9 facing up.
- Deploy the Artilleryman Sniper on F6 facing down.
- Deploy the Pusher Specialist on F10 facing up.
- Deploy the second Medical Medic on F8 facing right.
- Deploy the first Defender on G9 facing right.
- Retreat the Charger Vanguard and deploy the strongest Defender on D8.
It is important that these steps are executed in the specified order to make sure that enemy ranged units will target the Defenders as they were placed down last due to the aggro system.
This setup will last until 250 kills. Feel free to activate skills in sticky situations.
Step 3
At 250 kills, retreat the Pioneer Vanguard. There should be more than 125 DP. If the player has less than 125 DP then keep the Vanguard around for longer. Retreat once the DP is sufficient.
This setup will continue until 330 kills. If there are any tough situations, feel free to use skills.
Step 4
At around 340 kills, a Logger shows up on the top right. To make sure that the Defender survives, use their skill. Retreat the Artilleryman Sniper shortly after.
At 350 kills, another Logger will appear on the top right, so use the skill again if it is ready. Otherwise use the Medic's skill. In addition, 2 Caster Leaders and a Logger will come from the middle left and try to take the shortcut to the top left. As soon as the Caster Leaders reach D5 and turn to the top, deploy a Marksman Sniper on F3 facing right. The Sniper must have at least 901 HP to survive the Caster Leaders' attack. It is also imperative to not deploy the Sniper earlier or else the Caster Leaders will attack (and KO) the Sniper.
Once the Caster Leaders are killed, deploy a Guard on F5 facing down to kill the Logger. Once the Logger is killed, retreat both the Sniper and the Guard, and deploy the Artilleryman Sniper on E10 facing left to help with DPS.
Once the wave is cleared, deploy the Charger Vanguard on B8 facing left, who will help kill Crownslayer who appears shortly after.
Step 5
If Crownslayer does not die from the Charger Vanguard, deploy the Guard on D6 facing left once Crownslayer had reached D5 and stopped there. If the Guard is deployed before, Crownslayer will use her skill to blink past the Guard.
Retreat the Guard once Crownslayer is killed, use all the skills, and deploy the last Sniper on C10 facing left to wrap things up.
